WordPress 5.8 update has introduced a new block called Query Loop Block. This block is by far one of the most useful blocks that bring Gutenberg full site editing one step closer. This block has a lot of potentials and if you use it in the right way you can create some very awesome-looking pages with dynamic content on your website using any code or third-party plugins.
In this article, we will learn what query blocks are, how can we use them, what are some use cases, what are different options available for this plugin, and how to use multiple query loops, so let’s begin.
Table of Contents
What is Query Loop Block?
So let’s start with knowing what exactly is Query Loop Block? The query loop block is an advance block that can show your site’s post based on specific parameters set by you. Basically, it’s like a PHP loop to fetch posts and you can define certain parameters as part of the query to get specific data dynamically. Sounds too technical because you don’t know to code? Let me simplify that for you.
Simply with query block, it asks WordPress that every time when a user loads the page send a request to WordPress and asks for the posts and WordPress returns the post, and based on returned data the block will simply list the result WordPress has returned. Bonus is that while requesting for the post you can specify things like how many posts you want, from which author or category, and other things like that.

The image you are seeing above is a query loop block. The above block will show the three latest posts from my website automatically, you can also query for other posts of my site using the bottom paginations buttons. If I publish any new post on my website the above block will show the latest post automatically without requiring me to update the page from the editor.

When you check the structure of the above code you will see quey loop block content some other blocks in itself. It has a section for post template and query pagination.
What Are Some Use Cases?
Now we know what query loop block is so now it’s time to take a look at some of this block’s use cases so you better understand the benefit of using this block and why it’s so amazing.
Show recent posts on your homepage: You can use query block to show your recent post on your website homepage or on any posts or pages. You can even mix multiple query blocks to make an even better design as we have shown in the image below.
In the above image, we are actually three query blocks grouped together in a column and the first query is fetching the latest post, the second query is fetching the latest post except for the first one and the third query block is fetching the latest post ignoring the first three posts. And by merging together we have got this beautiful-looking layout. Later in the article, we will see how we can create this block.
Show recent posts from a selected category or tag: You can also use the query block to show the contents from your selected category or tag. If you are creating a page for some specific topic you can list all the articles based on that exact topic and that can be very useful.
Show post of selected author: You can also filter the query block to only get the post from the selected author so if you are making an author page you can now list all of his or her articles on that page.
Show selected post type: You can also use query block to show specific post types, such as your posts, page, testimonials, or any different post or page type that you have created. By default, you only get to choose a post or page but if you add let’s say a testimonial page type then you can target that specific page type as well.
How to Use Query Loop Block?

Now let’s see how exactly we can use query loop block in our post or page. To add a query block into our post is the same as any block just create a new page or post or open the old page or post in the block editor. Now you can either click on the plus icon and search for the query block or you can type “/query” to add the block quickly in your post or page.

Now when you add the block you’ll get the option to choose the pattern for the block.
- Next Pattern: It will let you check other patterns available for the query loop block.
- Carousel View: It will show you the available patterns in the carousel view.
- Grid View: It will show you the list of available patterns in the Grid View layout.
- Start Blank: It will let you choose a black template for your query block.
- Choose Button: It will choose the pattern you have selected for your query loop block.
Note: You can not change the pattern layout later after choosing, so in case you wanna choose the new pattern you have to remove the block and then re-add it.
Pattern Layout
When you choose a pattern for your query loop block based on the selected pattern the editor will add the block or group of blocks to your editor sometimes it even adds multiple query loop blocks as shown in the example image above. You can see the pattern has two columns and both of these columns have different query blocks.
Start Blank

In case you don’t like these available patterns and want to build something of your own then you can choose the Start Blank option. When you choose it you will get an option to choose the layout for the block as shown in the image above. You can choose any of the four given options as highlighted above. Don’t worry about it too much you can add or remove any content later if you want.

Based on your choice block will be added, in the start blank option, you’ll also get a pagination option added below as shown in the image above.
Customization Options
There are tons of ways to customize query loop blocks, query loop block is made of nested blocks and you can arrange those nested individual blocks separately and customize each of them separately. The best part is if you made changes in the nested block of the query loop block the changes will be applied to other similar blocks of the same type.
For example, check the video we have shared above, as you can see in our quey block I am adding a featured image in one article and it is getting applied on all three. Similarly, the design changes in one container are being applied to others too.

Also, all the post blocks automatically get their content based on the article you are putting them so those are the best blocks to use to customize query block.
Toolbar Controls
Now let’s take a look a toolbar controls available for the blocks:

- Block Default: These are a kind of default control for most blocks, these are used to select and move blocks.
- Alignment: It will let you change the alignment of the query block, however, one annoying thing about them is when you choose wide or full the block gets wide or full but not the content so you also need to set the alignment of the nested block to make it work.
- Display Setting: This is one of the most crucial controls of a query block, it will let you limit the content you want to see.

- a. Item per page: This will let you define the number of posts you want to show
- b. Offset: This will be used to define the starting point from where the query should start. For example, if you type 3 in the offset in the query loop block the fourth recent post will be loaded and first, three will be ignored.
- Max page to show: This can limit the pages you want to show in the bottom pagination. If you pass “0” then all the pages will be added.
- Block View: It will let you choose the view for the block, you can either choose list view or grid view by default list view will be selected.
- Default Options: These are standard default options given for the block normally except for the query block you won’t see the options to convert the block to HTML.
Sidebar Controls
Sidebar Controls are most crucial for the query block, all the filters and other things are controlled via sidebar so let’s take a look at them first. The sidebar controls are separated into four different sections color, settings, filters, and advanced. So let’s look at them one by one.
Colors
Colors controls are basic Gutenberg color controls, you select a solid color for your texts and you can choose either solid color or gradient as background for the query loop block.
Settings
These controls give settings for the query loop block, this section has 5 options mentioned below.

- Inherit query from template: This toggle will let you enable if you don’t want to filter content manually and want your template to manage the query.
- Post Type: The type of post you want in your query block, if you create any custom post time you choose that custom page type here. By default, you get to choose between post and page.
- Columns: Number of columns you want in your query loop block.
- Order by: It will let you sort your post, you can choose between Newest to oldest, Oldest to Newest, A to Z, and Z to A.
- Sticky posts: It will let you choose if you want your sticky posts included in your query loop block. You can choose between exclude, include, or include(only show sticky posts).
Filters
As the name suggests Filters let you filter the query so you can specific posts as per your need.

- Categories: You can type the categories you want in your query loop block so only posts from that specific category get loaded. You can add multiple categories by separating their name with a comma.
- Author: Choose the authors of whom post you want in your query loop block.
- Keyword: If you want certain post tags only in your query loop block you can add them here.
Advanced
Here you get some advanced controls for the block that you don’t use very often.

- HTML element: It will let you choose in which type of element you want your query blocks result, it will be useful if you are using your query block in some sidebar areas.
- Additional CSS classes: It will let you add some additional CSS classes for your query block to style them using custom CSS.
Create an Amazing Block
Now next after learning and understanding how to use query block it’s time to create your own page with query block. I have created an example for this tutorial so let’s take a look at how I have made that.

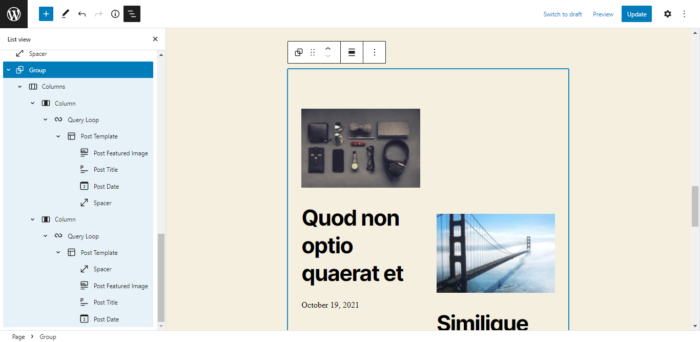
In the above image, you are seeing a layout created by me, I have used three query loops in the above group. First I have a column with 50% area and the other two columns are taking 25% each on the page. In the first column, I have limited my query two to show only one latest post. It has a post feature image, heading of the post, post published date, and excerpt. In the second column, I have limited my query to show only two posts, and I have set the offset to “1” so the first post won’t load in this column. In the third column, everything is the same except the offset is now “3” so the column will have the latest post starting from the fourth one.

You can check the complete structure of my block in the image above to better understand its contents.
Conclusion
Now you know all about query loop blocks, what they are how to use them and how to create some amazing-looking designs by using multiple query blocks at once. If you face any issues while following this article or have any suggestions, questions or doubts make sure to comment down below we will answer all of them.
While you are here make sure to check our other articles on Gutenberg Block Editor to stay updated on all the latest features and bugs about WordPress.